Play Agar.io at school
 I have no abilities in the cookie cooking department, so today i am teaming with the excessively skilled Laura from Cadillac Cookies. Whenever I say exceedingly, it is basically an understatement in the event that you pass her angry skills exhibited on her drool worthwhile Instagram web page!
Laura is a Silhouette owner also and she actually is finally identified steps to make stencils for decorating cookies, by cutting food safe stencil material (like Acetate sheets) on her behalf die cutting device. Stencils alllow for a lot easier cookie decorating, especially when the style is extremely detailed or a background design.
To produce yours cookie stencils with Silhouette, start with opening up Silhouette Studio and setting up your design. Because of this example we are utilising the Silhouette class logo because...well, precisely how cool is that?!
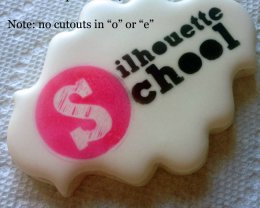
Now dependent on your design you may want to earn some improvements getting a far better cookie stencil. For example, whenever we used the Silhouette School logo design without having any modifications this is actually the form of stencil you'd get...
You can see that o's and age's have no counters (this is the formal globe for facilities or cutouts).
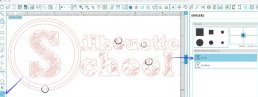
But by using the erase or knife tool, when I explained within tutorial on how best to make 100% better stencils, i will rapidly and efficiently change this design into an even more stencil friendly design. By simply getting rid of a very little section of the age and o (inside circled areas) it 'bridges' the countertop on remaining stencil so that they cannot drop out causing you to be aided by the preceding result - but rather a perfect stencil.
Okay so as soon as your design is all ready, you need to shape it. The snacks are about 4" so we made the stencil a little smaller. Laura slashed it on a food safe Clear Acetate sheet (.003 never .007!!) on the Silhouette CAMEO. (I did a few test cuts myself to be sure the configurations worked well, too.) Note: know that if you should be cutting meals stencils on your Silhouette CAMEO you ought to hold a blade and mat exclusive to those products.
Also, when you have really small and step-by-step places you might want to slow the speed down a little.
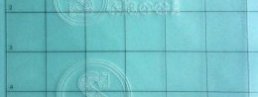
And here is how the finished stencil seemed before the removal of it off the pad.
After the stencil is slashed, remove it from the cutting pad and weed it. You desire plenty of extra acetate across the stencil so don't be stingy when cutting (or miss cutting around everything together)...cut wayyyyy out and around giving your self at the least a few inches on all edges for the stencil.
Now comes the difficult component - getting that perfectly airbrushed stenciled cookie appearance!
Laura and I also were tag-teaming this guide from half way nationwide so I wished to test out this technique for myself before we informed her the right slice settings...
Since I have do not have all this work elegant schmancy cookie enhancing gear like an airbrush firearm and compressor we tested on cardboard with spray paint. As you can plainly see it was an amazing stencil every single time - even in more detail by detail places.
 So with that...Laura got to work on some actual cookies. She ices the woman cookies first so she's got a fantastic also (and delicious base) to airbrush on. To put on the stencil positioned while airbrushing, she uses an approach using magnets, which she picked up from Callye at Sweet Sugarbelle blog site.
Whilst to not ever re-invent the wheel, merely flip over a cookie cooking sheet. You are able to protect the back side of it with a paper towel if you want to protect the rear associated with the cookies. Position the cookie on the report towel and put the stencil on the top. Now maintain the stencil in place, use four big magnet, one on each spot associated with the stencil to carry it into destination. The magnets will follow the cookie sheet and maintain the stencil set up.
Now you're willing to start airbrushing the snacks! Laura started by airbrushing the black places.
This stencil proved only a little challenging because the S ended up being slashed separately as you care able to see right here...
But Laura got around that through the use of a chopstick to greatly help secure the "S" in place, so that it won't strike away whenever she was airbrushing the green area.
And so my stenciled cookie-loving pals, which is the method that you slashed DIY cookie stencils making use of a Silhouette device.
Oh and PS if you're a cookie or cake decorator that's deciding on getting a Silhouette to boost your styles and create stencils...my guide the best Silhouette Guide will educate you on all you need to understand the Silhouette software Studio and how to make use of the machine and materials!
Note: This post may consist of affiliate marketer backlinks. By hitting all of them and buying products through my links, we receive a small commission. That's what assists investment Silhouette class so I can keep purchasing brand new Silhouette-related items to show you how to obtain the most from your machine!


Share this article
Related Posts


Latest Posts


